Typical Lightroom processing steps.

Photography Editing & Workflow Read about my photography experience

By Simon Hawketts ·

In this post I'm going to outline my typical Lightroom processing steps I go through to take an image from the initial RAW capture to the final image. This is as much an aide memoir to my future self as a guide to others, and in no way is this the only sequence that could be used.

Typical Lightroom Processing steps in Images
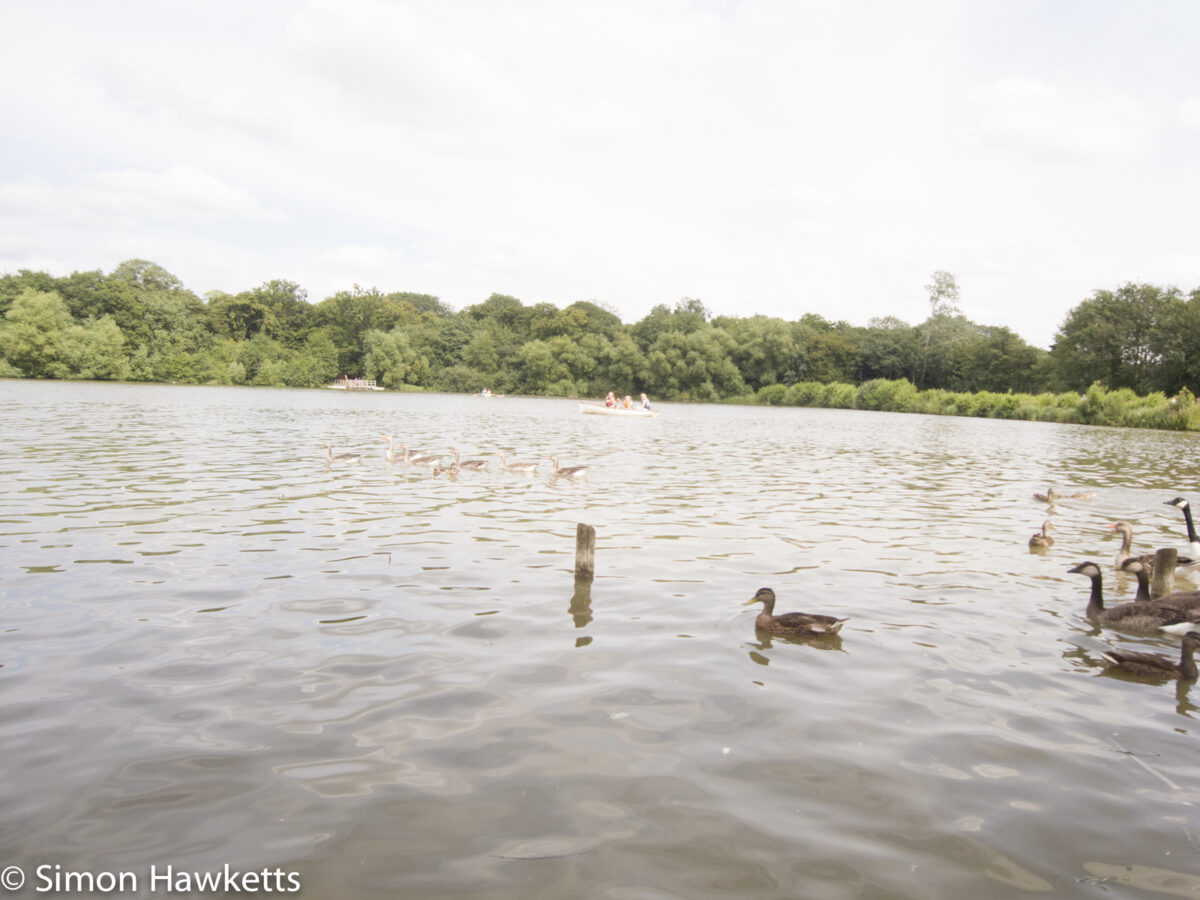
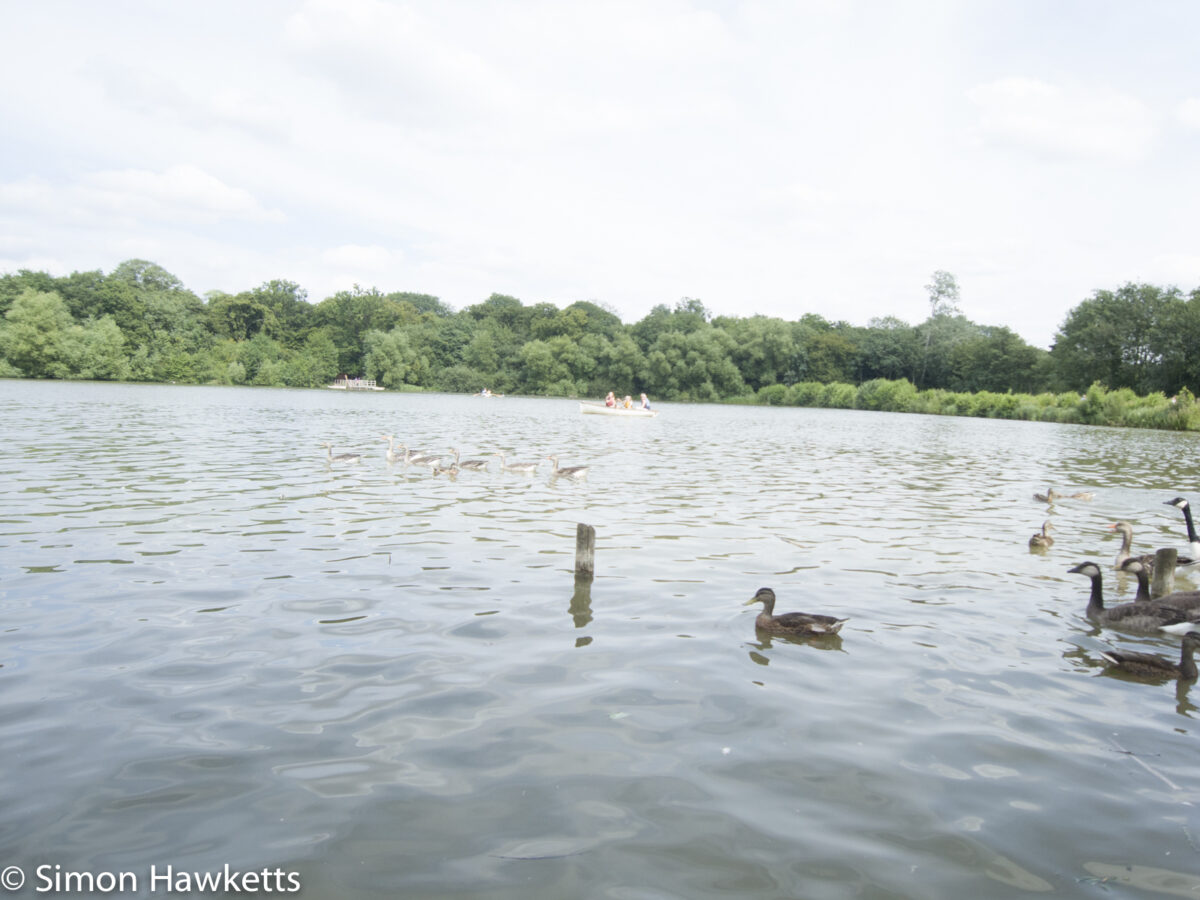
The image above is one that I took with my Ricoh GXR fitted with the S10 lens unit. The image is not a particularly good one but it seemed a reasonable choice to describe the steps I normally take.

First I need to say that this image was recorded in RAW as all my images are. The initial image above shows a picture which is over exposed and not level and doesn't really have any part of the image which draws the eye or provides interest. In fact, because the picture is over exposed, the geese on the water beyond the post are almost indistinguishable.

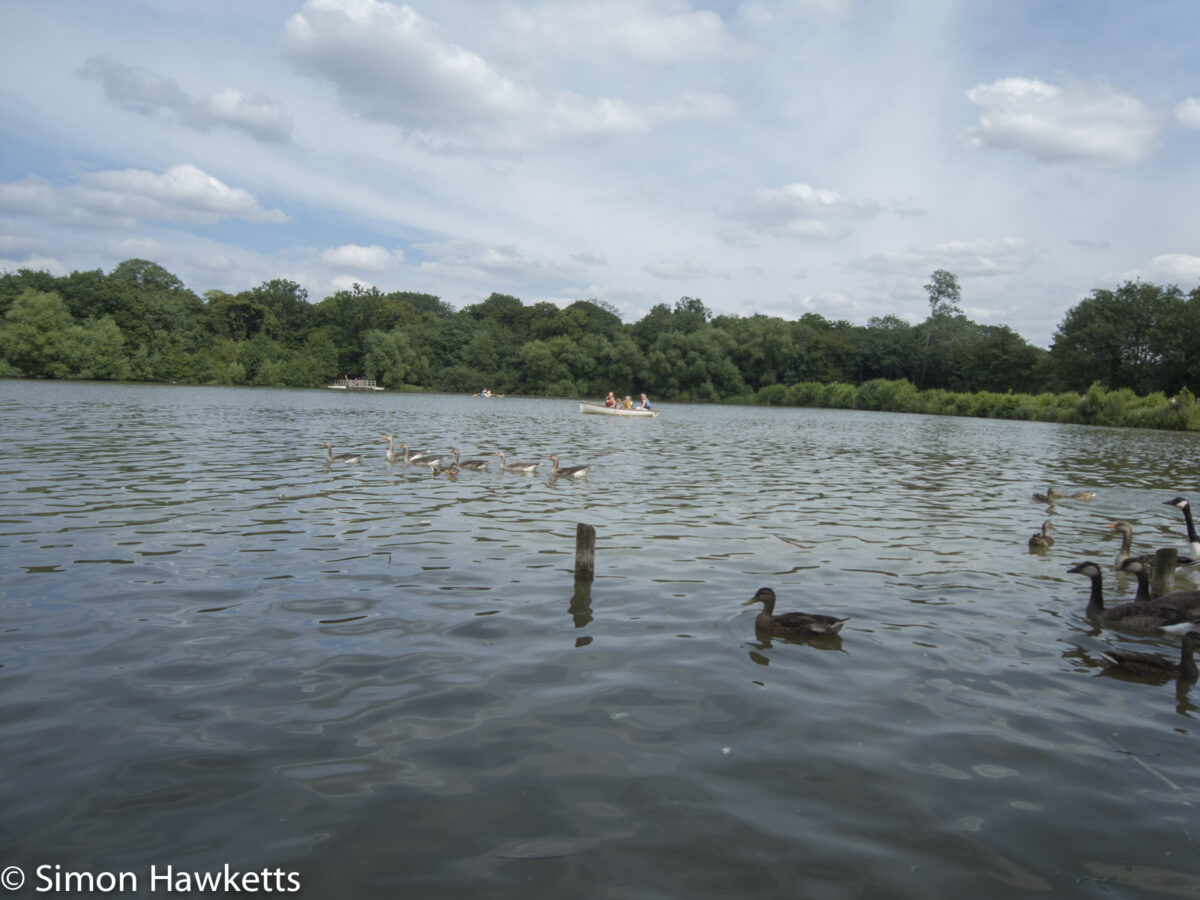
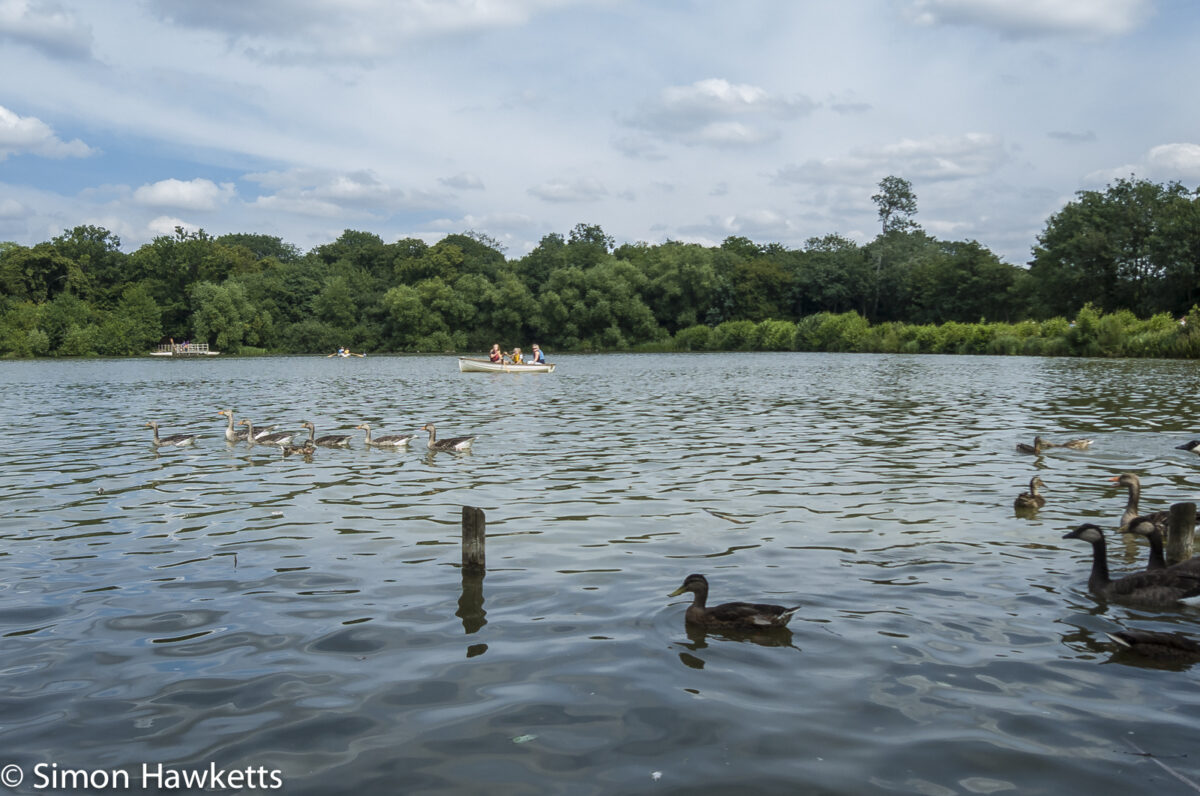
The first step I took was to get the white balance set. In this case it was really just a case of selecting the daylight white balance preset in Lightroom, but in more difficult cases I sometimes use the picker to find an area of the picture which is white and correct for that point.

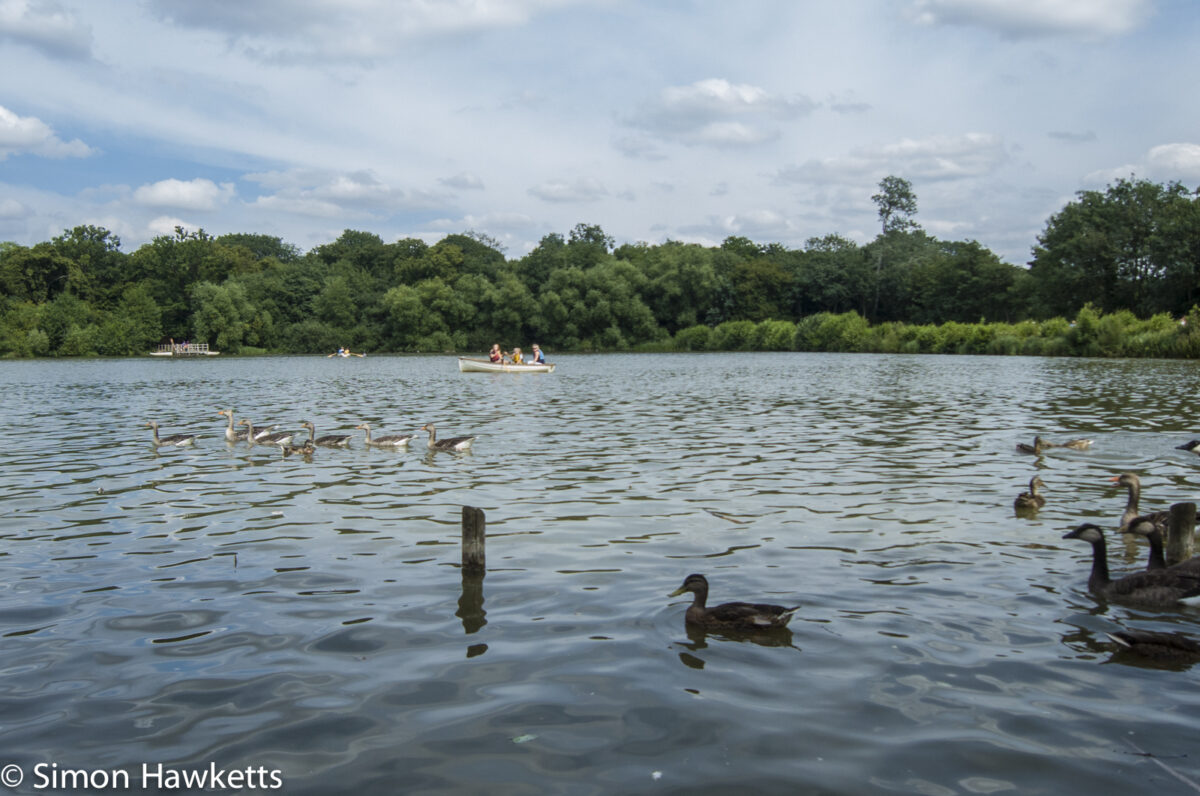
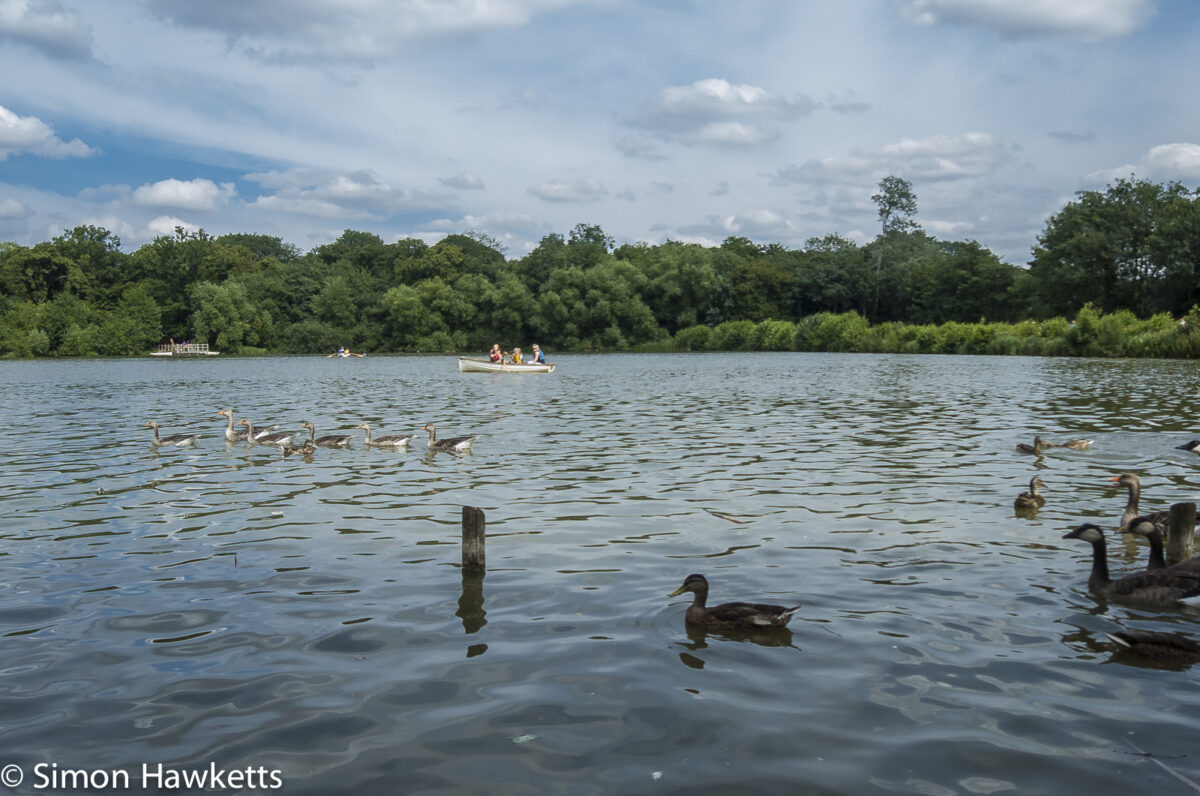
The next step was to get the exposure right. This involved reducing the over exposure by about 1 1/2 stops, dropping the highlights to get some detail back into the sky, and then increasing the shadow fill light a bit to get some detail into the dark areas of the trees.

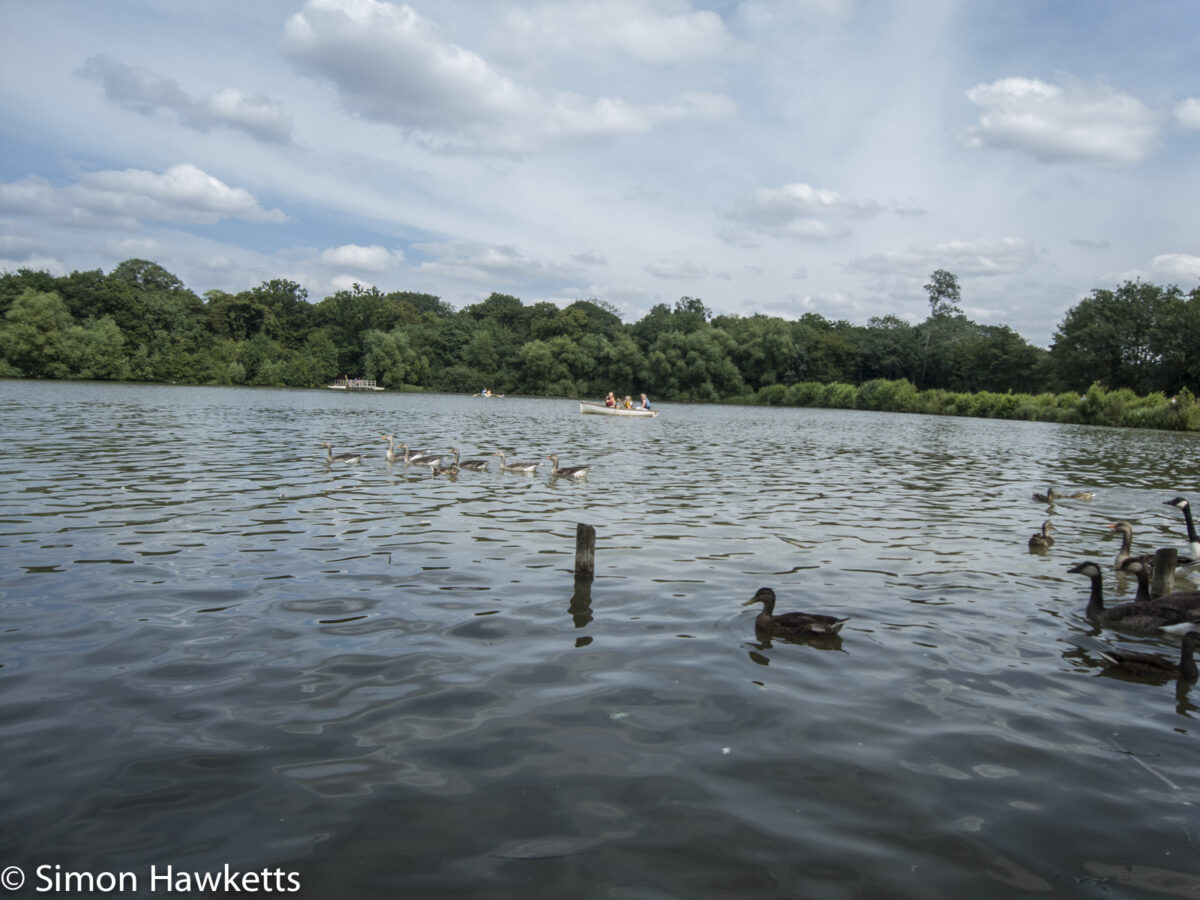
I next adjusted the clarity and vibrance to push a bit more detail into the picture and boost the colours a bit. I try not to be too excessive here, because I have a tendency to over do this stage so I go to where I think it's ok and then back off a step.

The next step I took was to crop the picture and straighten the horizon (it's particularly galling that I had to do this since the GXR has a level indicator, as does my main camera the K5!) During this process I placed the post in the water at about the rule of thirds line in the final cropped image. Although this is not a be-all-and-end-all rule, I find it pretty effective and use it more often than not.

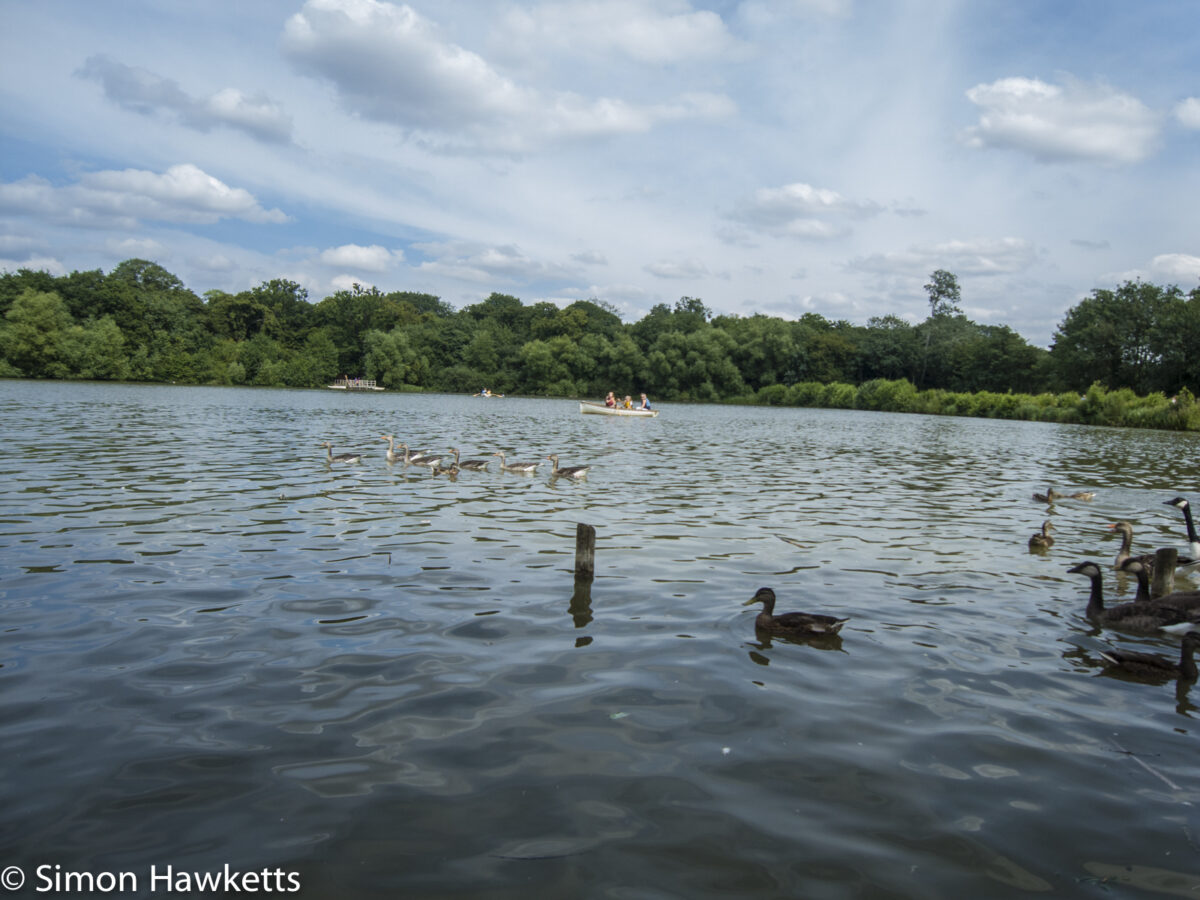
Sharpening was the next step I applied. By holding down the ALT key on the mac as I adjust the Radius, Detail and Masking controls it's quite easy to set the level you want as the display turns to a monochrome image which the adjustment being made is highlighted. Once these three are set, the level of sharpening can then be set - which I did on the three people in the boat, zooming the display it as I adjusted.

I made one final tweak of the image, reducing the brightness of the sky using the HSL picker to select the point in the sky I wanted and dragging the luminance down.

As I said at the start, this is by no means the only way or necessarily the correct way to process images, but it has most of the steps I currently practice and will make useful reading for myself in a few months / years time.
Comments (62)

  1. View of Durham Cathedral | Simon Hawketts's Photo Blog
    […] post processing I followed my usual process, and also added a graduated filter from the top corner to reduce some over exposure in the […]
  2. Raby castle | Simon Hawketts's Photo Blog
    […] followed my usual post processing procedure and cropped slightly from the original slightly taller […]
  3. Experiments in Photoshop 2 – Photo retouching | Simon Hawketts's Photo Blog
    […] using a Pentax K200D with 18-55mm standard kit lens. Normat post processing was done in Lightroom following the same processes I always use. As a picture it is fine, but the telephone line across the top right corner is […]
  4. A walk with a macro lens | Simon Hawketts's Photo Blog
    […] of spring’ but they are all images I found interesting. They have all been shot in RAW and post processed in Lightroom and one shot had a bit of a clean up in […]
  5. Soligor C/D Wide auto 28mm f/2.8 macro on nex | Simon Hawketts's Photo Blog
    […] These shots went through my normal Lightroom processing steps. […]
  6. Takumar 55mm f/1.8 macros | Simon Hawketts's Photo Blog
    […] of these shots were taken at F/1.8 to emphasise the shallow depth of field and I carried out my normal Lightoom processing […]
  7. Walk around the suffolk countryside | Simon Hawketts's Photo Blog
    […] of a star and I think these pictures in part show why I came to that conclusion. Although I did my normal Lightroom postprocessing, the colour in particular was very good when this lens was attached to the […]
  8. Dunwich Heath on the Suffolk Coast | Simon Hawketts's Photo Blog
    […] the lens down beyond f/8. On a couple of the pictures this led to visible marks, so as well as my normal Lightroom processing steps, I also had to use photoshop on a couple of pictures to remove those, and on one picture I removed […]
  9. Framlingham town and castle pictures | Simon Hawketts's Photo Blog
    […] of the pictures included here were taken in raw and processed in Lightroom 5 using the same workflow I always […]
  10. A few samples with a Minolta MD 50mm prime | Simon Hawketts's Photo Blog
    […] bit dull and lifeless on first import into Lightroom, they punched up nicely when I went through my standard Lightroom workflow with […]
  11. Macro photographs with my Nex 6 | Simon Hawketts's Photo Blog
    […] All these shots were taken in natural light and using either aperture priority or shutter priority mode on my sony nex 6 with a Tamron 90mm f/2.8 macro lens. The post processing was all done in Lightroom 5 following my usual processing steps. […]
  12. Pentacon electric 50mm f/1.8 review on Sony Nex 6 | Simon Hawketts's Photo Blog
    […] processed in Lightroom gallery are all images I’ve run through my normal Lightroom processing steps. This gallery is really to show off the lens in its best light and to show the sort of image […]
  13. Butterflies and other insects | Simon Hawketts's Photo Blog
    […] of these pictures have been processed in Lightroom using my normal post processing […]
  14. Centre Parcs – Woburn forest | Simon Hawketts's Photo Blog
    […] All these pictures were taken with my Takumar prime lens set and processed in Lightroom using my normal post-processing workflow from the raw […]
  15. Meyer-Optik Gorlitz Lydith 30mm f3.5 on Sony Nex | Simon Hawketts's Photo Blog
    […] today just to show off what the lens is capable of. These were all processed using my normal post processing workflow in […]
  16. A few samples from a Meyer-Optik Gorlitz Domiplan | Simon Hawketts's Photo Blog
    […] This post shares a few sample pictures and a video I took with my Sony Nex 6 camera fitted with an M42 mount Meyer-Optik Gorlitz Domiplan 50mm f/2.8 manual lens. I received this lens as part of a Praktica Nova 1B kit I bought from eBay last week and I’ve been interested in how the lens would perform. I may do a fuller review later, but for the moment I’m quite impressed with the quality of this lens, which was a bottom of the range intro lens for praktica 35mm SLR’s. All these pictures have been processed using my normal Lightroom workflow. […]
  17. Views around Westminster | Simon Hawketts's Photo Blog
    […] I’ve post-processed these in Lightroom using my usual steps […]
  18. Autumn in super wide-angle | Simon Hawketts's Photo Blog
    […] I post-processed these shots in Lightroom using my usual post-processing techniques. […]
  19. Tamron BBar Multi C 28mm f/2.8 on Sony Nex | Simon Hawketts's Photo Blog
    […] All these images were processed using Lightroom 5 using my normal post-process steps. […]
  20. Steve
    Have you ever tried Photo Ninja? Not as complete as Lightroom, but there's one feature I do wish LR had. It has a selective colour tool (as does LR) whjere you can saturate (etc) certain colours. The differenec eis that you can also affect neighbouring hues on a progressive sliding scale so that the end result is not too isolated or garish.

    Comments (1)

    1. Simon Hawketts
      I've not tried it but I'm always up for trying new things out so I may download a copy - I assume there is a trial period of some sort.
  21. Optomax 300mm f/5.6 M42 lens on Sony Nex | Simon Hawketts's Photo Blog
    […] There was a small amount of chromatic aberrations – particularly when shooting into the sun, but these were easily fixed in Lightroom by choosing a profile of a similar lens (I used a pentax 300mm  lens) and applying the corrections. The pictures were post processed using my usual post processing techniques. […]
  22. York Minster pictures | Simon Hawketts's Photo Blog
    […] Obviously, there are several parts of a church interior which are dark places, so a lot of these pictures were taken with wide apertures and using my camdiox focal reducer, which adds about a stop to each lens attached, but even so a lot needed quite high ISO to reduce the shutter speed to a point where I could hand hold. The majority of this pictures were taken with a Takumar 55mm f/1.8 on the Camdiox, or a Soligor 28mm f/2.8, and all the pictures have been processed in Lightroom CC using my normal workflow. […]
  23. Ricoh GXR 50mm macro unit | Simon Hawketts's Photo Blog
    […] level of performance from the lens/sensor unit. Each of these were processed in Lightroom using my normal processing steps but didn’t require a great deal of […]
  24. Ricoh GXR A12 Mount first impressions | Simon Hawketts's Photo Blog
    […] are some examples I’ve taken over the course of the last few days. These have had my usual tweaks in Lightroom but haven’t needed a great deal of […]
  25. Ricoh GXR A12 28mm samples | Simon Hawketts's Photo Blog
    […] The pictures below are ones I’ve taken over the last couple of weeks as I had the camera with me on various walks and family occasions – they have been processed in Lightroom CC using my normal workflow. […]
  26. Some samples from a Steinheil Munchen Cassar S prime lens | Simon Hawketts's Photo Blog
    […] All the images were taken in RAW and processed in Lightroom CC using my normal workflow. […]
  27. Evening in Gloucestershire | Simon Hawketts's Photo Blog
    […] bathed in late evening sunshine. All these pictures have been imported into Lightroom CC for post processing and then exported at 1600px on the longest […]
  28. Bourton-on-the-water snapshots | Simon Hawketts's Photo Blog
    […] we got home I imported the pictures into Lightroom and picked the shots which I found the most appealing to include in this […]
  29. Chipping Campden snapshots | Simon Hawketts's Photo Blog
    […] we returned I imported the pictures into Lightroom CC and applied my normal workflow process. The panorama was stitched together in Lighroom using the new Merge to Panorama option, and then […]
  30. Post-processing film scans in Lightroom | Simon Hawketts's Photo Blog
    […] couple of years ago I wrote a post which described the normal steps I take when post processing pictures in Lightroom. The procedures I describe there are still the way I carry out post processing when dealing with […]
  31. A few samples from a Schneider Edixa Xenar 50mm f/2.8 lens | Simon Hawketts's Photo Blog
    […] These pictures were all taken on a walk this morning using Shutter Priority and Auto ISO which allowed me to set both aperture (on the lens) and shutter speed (on the camera) and the camera to set the iso. The images were imported into lightroom and processed using my normal processing steps. […]
  32. Snowshill Manor National Trust pictures | Simon Hawketts's Photo Blog
    […] The 35mm shots were developed by Photo Express in Hull and also scanned by them, although following the success I’ve had with home scanned negatives, I may rescan some of my favourite pictures myself later. All the pictures were imported into Lightroom for post processing using the steps I normally take. […]
  33. Experiments in early morning photography | Simon Hawketts's Photo Blog
    […] much needed in terms of exposure correction for any of the pictures. I carried out my usual processing work flow and then had a think about the things I would change and what I learnt from the […]
  34. Sigma Mini-Wide 28mm f/2.8 on Fuji X-T1 | Simon Hawketts's Photo Blog
    […] All these pictures were taking in Raw and imported into Lightroom where I used my normal digital workflow. […]
  35. Simon Hawketts's Photo Blog : Mamiya-Sekor 50mm f/2.0 M42 lens on Fuji X-T1
    […] all shot in Raw and imported into Lightroom CC where they had a minimal amount of Post Processing following my usual workflow before being exported as Jpeg files with a max length of 1000 […]
  36. A few samples with a Minolta MD 50mm prime — Simon Hawketts' Photo Blog
    […] bit dull and lifeless on first import into Lightroom, they punched up nicely when I went through my standard Lightroom workflow with […]
  37. Takumar 55mm f/1.8 macros — Simon Hawketts' Photo Blog
    […] of these shots were taken at F/1.8 to emphasise the shallow depth of field and I carried out my normal Lightoom processing […]
  38. Meyer-Optik Lydith 30mm f3.5 on Sony Nex — Simon Hawketts' Photo Blog
    […] today just to show off what the lens is capable of. These were all processed using my normal post processing workflow in […]
  39. Mayer-Optik Domiplan samples with a modern mirror-less camera
    […] All these pictures have been processed using my normal Lightroom workflow. […]
  40. A few samples from a Schneider Edixa Xenar 50mm f/2.8 lens — Simon Hawketts' Photo Blog
    […] and the camera to set the iso. The images were imported into lightroom and processed using my normal processing steps. To view these pictures in more detail look at the full sized versions here – use the arrow […]
  41. Optomax 300mm vintage telephoto lens on modern mirror-less camera
    […] There was a small amount of chromatic aberrations – particularly when shooting into the sun, but these were easily fixed in Lightroom by choosing a profile of a similar lens (I used a pentax 300mm  lens) and applying the corrections. The pictures were post processed using my usual post processing techniques. […]
  42. Soligor 28mm C/D f/2.8 macro on Sony Nex — Simon Hawketts' Photo Blog
    […] shots went through my normal Lightroom processing steps. Click on any picture for a bigger clearer image or to view in full size follow this link and […]
  43. Samples from a Steinheil Munchen Cassar S prime lens — Simon Hawketts' Photo Blog
    […] These samples were taken on a Sony Nex 6 APS-C camera in and around Loughborough in Leicestershire on a recent family trip. The macro images were taken with a short extension tube fitted to the lens to reduce the close focus distance. All the images were taken in RAW and processed in Lightroom CC using my normal workflow. […]
  44. Sigma Mini-Wide 28mm f/2.8 on Fuji X-T1 — Simon Hawketts' Photo Blog
    […] All these pictures were taking in Raw and imported into Lightroom where I used my normal digital workflow. […]
  45. Some samples from an Pentax-M SMC 28mm f/2.8 lens — Simon Hawketts' Photo Blog
    […] Each of these pictures were imported into Lightroom where they had a minimum amount of post processing, following my usual workflow. […]
  46. Ricoh GXR A12 50mm macro unit — Simon Hawketts' Photo Blog
    […] level of performance from the lens/sensor unit. Each of these were processed in Lightroom using my normal processing steps but didn’t require a great deal of alteration. You can see these, and all the other pictures […]
  47. Snowshill Manor National Trust pictures — Simon Hawketts' Photo Blog
    […] The 35mm shots were developed by Photo Express in Hull and also scanned by them, although following the success I’ve had with home scanned negatives, I may rescan some of my favourite pictures myself later. All the pictures were imported into Lightroom for post processing using the steps I normally take. […]
  48. Framlingham town and castle pictures — Simon Hawketts' Photo Blog
    […] of the pictures included here were taken in raw and processed in Lightroom 5 using the same workflow I always use. Use the gallery below to view the pictures or see the full size versions […]
  49. Dunwich Heath on the Suffolk Coast — Simon Hawketts' Photo Blog
    […] the lens down beyond f/8. On a couple of the pictures this led to visible marks, so as well as my normal Lightroom processing steps, I also had to use photoshop on a couple of pictures to remove those, and on one picture I removed […]
  50. Nex 6 Macro photographs — Simon Hawketts' Photo Blog
    […] All these shots were taken in natural light and using either aperture priority or shutter priority mode on my sony nex 6 with a Tamron 90mm f/2.8 macro lens. The post processing was all done in Lightroom 5 following my usual processing steps. […]
  51. Post-processing film scans in Lightroom — Simon Hawketts' Photo Blog
    […] couple of years ago I wrote a post which described the steps I normally take when post processing pictures in Lightroom. The procedures I describe there are still the way I carry out post processing when dealing with […]
  52. Mamiya-Sekor 50mm f/2.0 M42 lens on Fuji X-T1 — Simon Hawketts' Photo Blog
    […] all shot in Raw and imported into Lightroom CC where they had a minimal amount of Post Processing following my usual workflow before being exported as Jpeg files with a max length of 1000 […]
  53. Views Around Westminster — Simon Hawketts' Photo Blog
    […] post-processed these in Lightroom using my usual steps and there are full sized version available by following this […]
  54. York Minster Pictures — Simon Hawketts' Photo Blog
    […] Obviously, there are several parts of a church interior which are dark places, so a lot of these pictures were taken with wide apertures and using my camdiox focal reducer, which adds about a stop to each lens attached, but even so a lot needed quite high ISO to reduce the shutter speed to a point where I could hand hold. The majority of this pictures were taken with a Takumar 55mm f/1.8 on the Camdiox, or a Soligor 28mm f/2.8, and all the pictures have been processed in Lightroom CC using my normal workflow. […]
  55. Tamron BBar 28mm F/2.8 On Sony Nex — Simon Hawketts' Photo Blog
    […] All these images were processed using Lightroom 5 using my normal post-process steps. […]
  56. Ricoh GXR A12 28mm Samples — Simon Hawketts' Photo Blog
    […] The pictures below are ones I’ve taken over the last couple of weeks as I had the camera with me on various walks and family occasions – they have been processed in Lightroom CC using my normal workflow. […]