My assessment of Oxygen Builder as a non-designer – Brilliant.
A few months ago I bought a copy of Oxygen Builder for use on my vintage camera blog, and it’s only over the last couple of weeks, during the Christmas period, that I’ve been able to get time to give it a go. This post covers my impressions on using it, specifically from the view point of a developer who isn’t a front end designer.
I should say up front that I’m not connected with Oxygen and I haven’t been prompted by anyone to write this piece or give any particular conclusion.
What is Oxygen Builder?
For anyone that doesn’t know, Oxygen Builder is a WordPress page designer package which allows you to design a template for a WordPress page, post or custom post type using a visual interface. It is similar to many other page designers, except with Oxygen the entire WordPress theme is removed and replaced with the Oxygen templating system.
This means that you can’t just install Oxygen and tweak the design of a site – once it’s installed the entire site design needs to be created so that needs to happen off-line, on a development site, and then the site put into maintenance mode to apply the design [efn_note] Only on the first initial change to oxygen – once the change has been made new templates and changes to templates can be introduced with the site live[/efn_note]
Why I bought Oxygen Builder
So I guess it’s safe to say I’m not a typical buyer of the Oxygen Builder package. The package is aimed at development agencies who create WordPress sites for customers, and who would normally fashion a theme to go with the site which meets their client’s requirements.
I on the other hand, am a developer who just runs a few blogs, so why did I buy it?
Well, one of the problems I have is that any theme I use on my found-film or vintage-home-movies sites doesn’t show the content of the custom post types I’ve set up in a way I really like. Since I’m intending to expand the use of custom post types to include vintage cameras, vintage projectors and vintage radios on this site, this problem is also pertinent on this blog.
Now, I could create a WordPress child theme and add templates to render the custom post types, but whenever I’ve tried to do that it involves using the CSS from the theme, or adding new styles, and that’s something I’ve found I’m just no good at.
Although I’m a web developer by profession (although just about to retire), I’ve always worked on back end systems rather than the front end. I’m much more likely to be pulling data from Elasticsearch or Dynamo DB than adding divs and lists etc to the front end.
So when I saw Oxygen Builder I thought that it might be just the thing I was looking for to allow me to easily create templates for my sites. As it happens when I looked in May last year, there was an offer on, and I could buy a lifetime licence for about £150, so I took the plunge.
Initially I installed the plugin on my development site and had a play around with it, but didn’t have the time to really devote to learning enough of it to be useful, so I didn’t get very far. In fact, I almost took advantage of the 60-day money-back offer and returned it, but in the end decided I’d try again at a later date.
Well, the later date has arrived and I devoted some time to trying it out properly. I also purchased a course on Udemy (again an offer which had the course available for £10) and that helped enormously in getting me past the basics and being able to be productive with Oxygen.
The other thing I should point out is that because I’m not a designer I just took the current design of the blog and replicated it using Oxygen – that seemed to be the best way to start to get to know the package without the pressure of trying to work out an actual design.
My assessment of Oxygen Builder
So this is my assessment of Oxygen based upon my use of about a week.
The first point to clarify is that although the theme is replaced, and you need to design templates for all the site pages, (i.e. Posts, Pages, Custom Post types, Archive pages, Search results etc), the templating structure of Oxygen means that you can get a lot of these covered with only a few templates.
When you create a new template you can inherit from other templates and you can define where that template is used with a large degree of control. This means you will have one template which has the header and footer design which becomes the base of all the other templates, and then you can create generic templates for all post types, all archive pages and a search results page and most of the content is covered.
Then you can create new templates and assign them to individual post types or category pages etc to override the defaults.
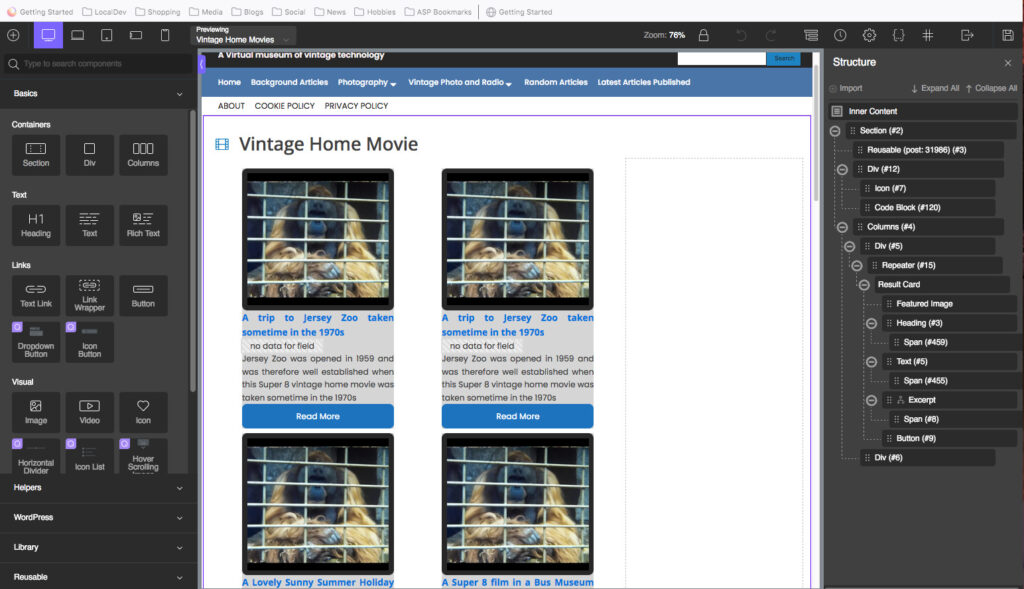
The picture to the right here shows the general layout of the designer.
In the centre of the pane is the content that’s being designed. On the right side is a pane that shows the structure of the content, which is very useful to select the correct element to work on.
On the left-hand side is a pane that contains all the different elements that can be added to the page. These range from simple elements like sections, divs, columns etc right up to complex elements like the repeater which allows you to query the WordPress database and create repeating lists or grids of data (that is the element shown on the page in the content).
From my perspective, as someone who has a basic understanding of the elements that go to make up a web page, but isn’t really experienced in CSS styling, I find the system Oxygen Builder uses to create the page incredibly useful and powerful. I don’t need to know exactly what each change is doing in order to get the design looking right (remember I’m copying an existing design), but interestingly, once I’ve started to create templates using this package, I’ve found I started to get a better understanding of the underlying changes anyway.
Features I like
The features of Oxygen that I particularly like are:
Make reusable components.
I find this feature very powerful. Any part of the page can be selected and saved as a reusable component that can then be inserted into any template. I used this with the display of metadata on each post page – it consists of some icons and WordPress data – and I found I was using the same data in lots of different locations, so I saved it as a reusable component, and then I can just insert it rather than re-creating and re-styling each time.
When you create a reusable component it can be inserted either as an editable component, which means each time it used it is an isolated copy that can be altered, or it can be inserted as a linked copy that will change if you update the underlying component. Both these types are useful in certain circumstances.
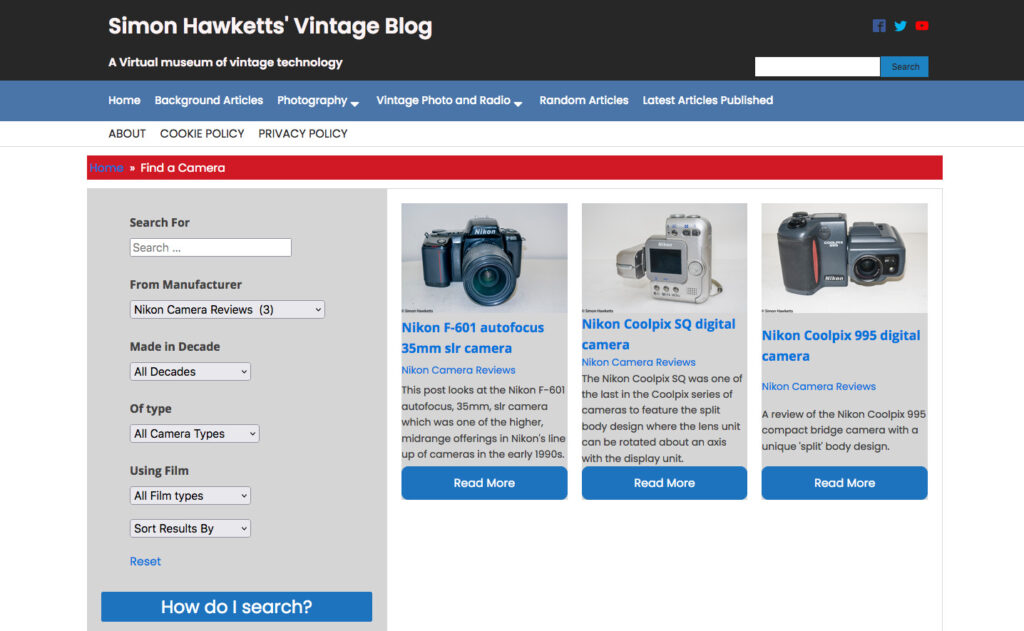
For example, I made a repeater a reusable component so that the styling of the result’s card could be reused across the site, but made each use editable, so I could a) edit the query that pulls in the content, and b) slightly change the card layout. This can be seen in the design of the ‘find a camera’ page where the cards look slightly different from the design in the earlier picture.
Add Styles to short code output
Another thing I really like with the Oxygen Builder package is the way it’s possible to style the output from short codes. WordPress plugins often use short codes to output content so that the user can add the content where they want in the post. I’ve used them for footnotes for example in many posts, including this one.
Well there is an option in the Oxygen Builder setup called ‘Selector detector’ which, when enabled, allows you to find the output of the short code in the content and give it a suitable name, and then apply any of the styling techniques provided to style the output.
This is a great way of making sure the output of your plugin matches the rest of the page style.
The flexible templating system
I mentioned the templating system earlier in the piece, but to my mind it really is one of the great things about the Oxygen system. Because templates can be inherited and can be applied flexibly, it’s possible to cover a lot of content with only a handful of templates and then build on them to cover extra details on certain pages.
Another part of the inheritance that I didn’t mention above is that each template can also have a priority value applied so that if there are several templates that could apply you can set the one which will be chosen. This means, in situations where you want to update a design on a live site, you can create a new template but give it a lower priority until you have the design worked out and ready to go. You can then set the priority value higher, so it becomes live.
Conditions
The conditions component is also very useful. This is basically a set of logic that can be applied to a component that decides if it will be shown or not. I’ve used it lots of places where there may not be data in the database and I don’t want an empty element so show up.
For example, many of the posts on this site don’t have a proper excerpt set. That’s a shame, and I’m going through posts to add that useful piece of data, but in the meantime, I can set the areas where the excerpt is shown to only display if the post has an excerpt. In that way, the site is kept cleaner as I work through the posts adding the data.
Conclusion
So my conclusion is that for me, as a non UI-designer developer, Oxygen Builder has been a really useful tool. I’ve found it easy to replicate the current design of this site on my development machine and once I got the hang of using it, I found it actually helped me to understand the underlying CSS that’s being used to style the site.
I haven’t yet pushed the design out to the site because I’m also going to me making a lot of other changes now I’m retired (well in 3 weeks), so I’ll introduce everything together, but certainly using Oxygen had made the process much easier and quicker.


